The Debrief · Debrief 04
Debrief 04
Why teams use width
Width isn’t about the touchline. It’s about what it does to the middle.
By Harry Lowe · 12 November 2026 · 13 min read
Read the article →
Introduction
Hey, legends 🤙🏼
Last week was all about the team without the ball. This week we flip it. When a team has the ball, one of the first things I look at is how wide they are, and who’s making them wide.
“Get it wide” gets shouted from every touchline in the country. But width on its own does nothing. The point of it is what it does to the other team: it stretches them, pulls players out of the middle and opens the gaps you actually want to play through.
So this week we start in Prague, where width gave Arsenal their first goal and nearly cost them the game, then go through the six things I look for, then you get to measure it yourself.
01 · Tactical breakdown
Width in Prague: beating a press and attacking the box
Slavia 1-2 Arsenal is a good case study because width did two different jobs in the same game. Arsenal used it to play past a high press. Slavia used it to get the ball into the box. Below are the concepts behind each one, with the moment from the game that shows it.
Part one · Width in possession
Using width to play past a press
- 1 · Pinning the full-back
- A winger who holds the touchline fixes the full-back in front of him. If the full-back steps inside to help, the winger is free. If he stays wide, the gap between him and his centre-back grows. Either way, the defence has a decision to make. The technical part is the body shape: open to the pitch, scanning before the ball arrives, so the winger sees the gap as it opens. Madueke held the line before the first goal.
- 2 · The blind-side run
- Running from wide into the channel between full-back and centre-back attacks the defender’s blind side. He has to track the ball and the runner arriving from opposite directions, and he can’t watch both. Timing is everything: go as the passer’s head goes down and curve the run to stay onside. That’s the run Madueke made on nine minutes.
- 3 · Width plus a target
- Against a high line, width on its own isn’t enough. You need a target who can win the first ball and play it on first time, so the wide runner is already moving when it arrives. That’s third-man play: the long ball goes to one player, the next touch finds another. Back to goal, body between ball and defender, one touch. Raya to Gyökeres to Madueke.
Watch for it: when a team presses high, watch the winger before the ball goes long. If he’s holding the touchline with the full-back pinned, the run inside is coming.
Part two · Width in the final third
Using width to attack the box
- 1 · Bodies against bodies
- A cross is only as good as the runners it finds. One striker against two centre-backs is a 1v2. Add a second striker and every cross becomes a 2v2, and the defence only has to lose one. Near post, far post, and the runs attack the ball rather than wait for it. Slavia brought Chytil on beside Nowak at half-time to do exactly that.
- 2 · Time on the ball for the crosser
- Defending crosses starts out wide, not in the box. Press the wide player and he has to hurry the cross or play backwards. Drop off and he gets time to look up and pick a run. IMO that’s why Arsenal’s second half got harder: they sat deeper, Slavia’s full-backs had time, and the shots went 17 to 12.
- 3 · The cross from deep
- A ball from deep, whipped between the keeper and his back line, is the hardest cross to defend. It needs one call from the keeper, come or stay, and any hesitation leaves a gap nobody owns. Technically it’s pace and curl away from the keeper into that corridor. Nowak’s goal on 90 minutes came from one.
Watch for it: when a team goes two up front, watch the other side’s defensive line. If it drops towards its own box and stops pressing the wide players, expect the crosses to start coming in.
From the game to the lesson
Six concepts, two jobs. Pinning, blind-side runs and a target get you past a press. Bodies in the box, time on the ball and the cross from deep get you into it. None of it is about the touchline. It’s about what being wide does to the other team’s shape.
That’s what the lesson below breaks down: six things I look for when a team uses width. You’ll see Prague in two of them, Madueke’s run in 04 and Slavia’s crosses in 05.
02 · Lesson
Why teams use width
Width is one of those things everyone mentions and few people actually watch. It’s not about how many players are near the touchline. It’s about what being wide does to the other team’s shape, and where that leaves space. Here are six things to look for, in the order they usually happen. In every board, blue is the team with the ball.
- Who holds the width?
- Stretch the back line
- The switch
- The run inside from wide
- Bodies in the box
- The space it leaves behind
1. Who holds the width?
Start with the simple question: on each side, who’s standing wide? Usually it’s one player per side, and it’s either the winger or the full-back. Rarely both.
That one choice tells you a lot about the plan. If the wingers hold the width, the full-backs are free to tuck inside and help the build-up, like City’s left-back playing as a ten. If the full-backs hold it, the wingers can come inside and play as extra tens or second strikers.
Watch for it changing. A lot of teams swap it during the game: the full-back overlaps, the winger goes inside, and the defender marking him has to decide who to follow.
For an analyst, write it as one line: “On the left, the full-back holds the width and the winger plays inside.”
2. Stretch the back line
Width isn’t really about the touchline. It’s about the gaps it opens in the middle.
When a team keeps a player high and wide on both sides, the other team’s full-backs have to go with them. That pulls the back four apart, and the space between full-back and centre-back gets bigger. That’s the channel attackers want to run into.
If nobody holds the width, the opposite happens. The back four stays narrow and compact, and every pass through the middle has a body in front of it.
When you watch, look at the distance between the full-back and the nearest centre-back. If it’s growing, the width is doing its job.
3. The switch
Most teams don’t attack down both sides at once. They load one side with players, draw the defence across, then switch it quickly to the far side, where the winger is now one against one.
The switch only works if two things are true. Someone has to be holding the width on the far side, and the ball has to get there fast, in one or two passes. A slow switch just gives the defence time to shuffle back across.
Count how many passes it takes a team to change sides. One long diagonal is a weapon. Five short ones is a recycle.
4. The run inside from wide
Once the defence is stretched, the most dangerous thing a wide player can do is go inside.
Some wingers start wide and run inside the full-back, into the channel behind him. That’s Madueke’s run in Prague: he doesn’t come to feet, he starts wide and attacks the space Slavia left behind their press. Others pick it up wide and cut inside on their stronger foot.
Either way, the defence has to shift across to stop it, and that’s when the far side opens up.
When a winger goes inside, don’t watch him. Watch the far side. That’s where the space is opening.
5. Bodies in the box
Width only pays off if someone is there when the ball comes in. A cross into an empty box is a goal kick.
Watch how many players get into the box when the ball goes wide. One runner is a hope. Three is a plan: one near post, one far post, and one arriving late on the edge for the cut-back.
That’s what changed for Slavia after half-time. With Chytil on beside Nowak, every cross had two targets against Arsenal’s centre-backs, and the chances started coming.
For an analyst, the number of runners at the moment of the cross tells you more than the number of crosses.
6. The space it leaves behind
Every bit of width has a cost. When a full-back pushes on to give width, there’s a space behind him, and the other team knows exactly where it is.
Good teams cover it before the ball is lost. The nearest centre-back slides across, or a midfielder drops into the gap, or the winger on that side tucks back. If none of those happen, the counter goes straight into that space.
That’s why you’ll often see one full-back go and the other stay. The one who stays, plus the two centre-backs, make a back three for when the ball is lost.
When a full-back goes forward, look at who’s behind him. If the answer is nobody, that’s where the next attack is going.
From the lesson to the resource
All six of those you can spot by eye. But if you want to know for sure which side a team attacks down, or whether their width changed after half-time like Slavia’s did, you need to count it. That’s this week’s free resource.
03 · Free resource and task
Your first data chart
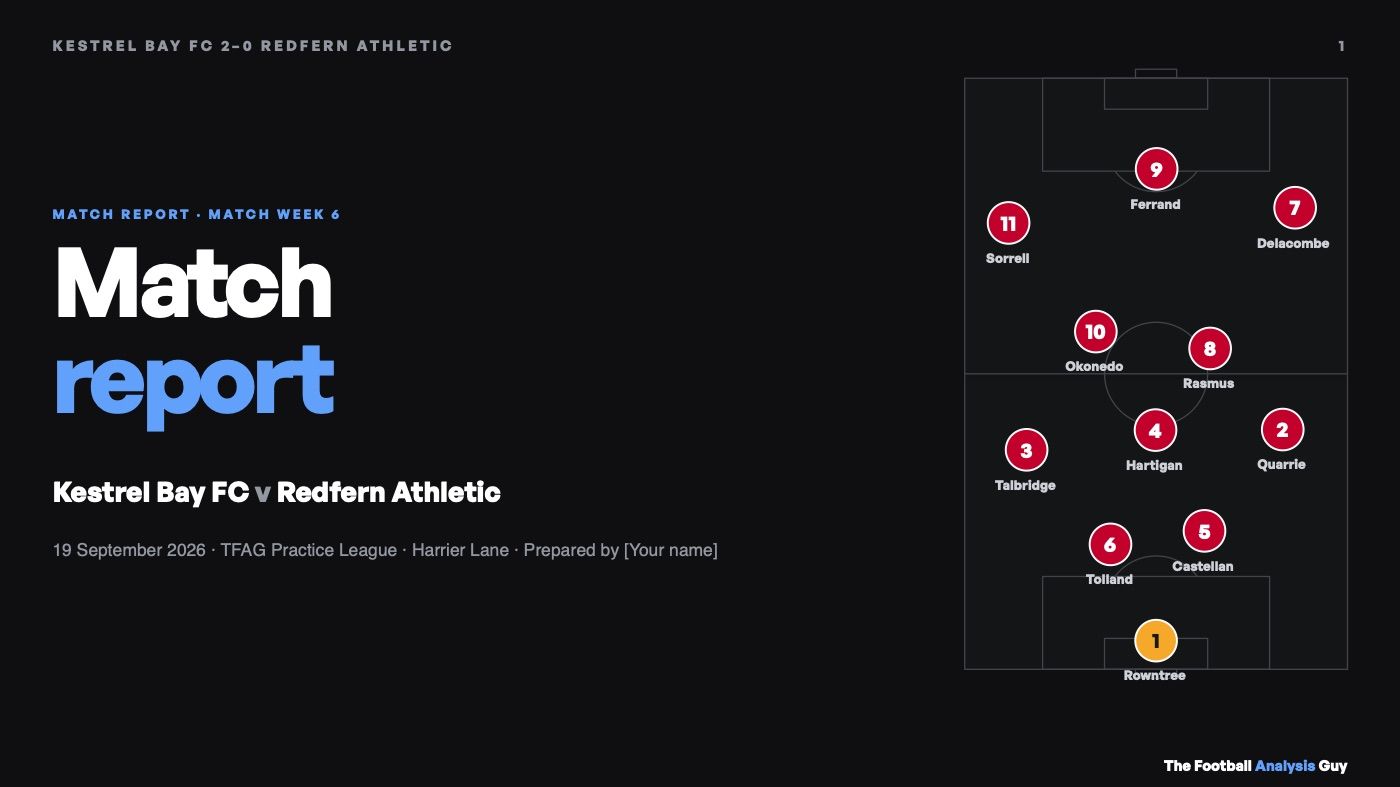
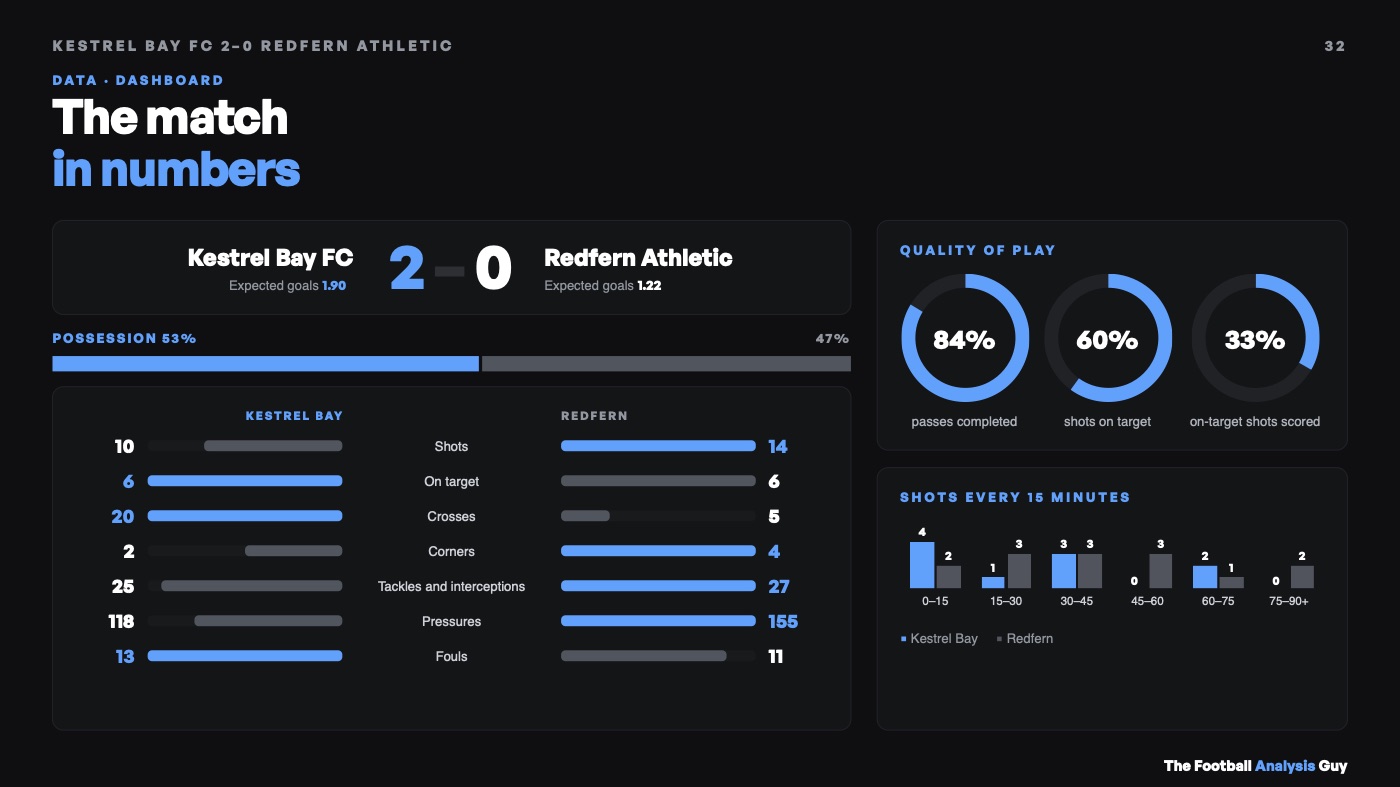
In Prague you could see the game move out wide after half-time. With data you can prove it. Your first data chart is the free Portal task that shows you how. It gives you a full practice match, Kestrel Bay FC 2-0 Redfern Athletic, laid out like professional event data, and walks you through turning hundreds of rows into one chart a coach can read in a few seconds.
What’s inside- The practice dataset: 3,943 events, every pass, carry, shot and pressure, with where each one started and ended.
- One question, one chart: who, where or when, and the chart that suits each one.
- A worked example: who gets Kestrel Bay into the final third, from definition to filters to chart.
- Three sentences: what it shows, what it doesn’t show, and what a coach should look at next.
- A step-by-step guide: Google Sheets, Excel or Numbers.
Which side do they attack down?
Part 1: measure the width. Open the practice dataset and answer one question: which side do Kestrel Bay attack down? Define it first. Ours: every completed pass or carry by Kestrel Bay that ends in the final third (end_x 80 or more). Then split the pitch into three channels by where each one ends, using end_y: left (0 to 26.6), centre (26.7 to 53.3) and right (53.4 to 80). Count each channel and make one chart.
Here’s a start:
- Question
- which side do Kestrel Bay get the ball into the final third on?
- Filters
- team = Kestrel Bay FC, type = Pass (outcome = Complete) or Carry, end_x 80 or more.
- Count
- split by channel using end_y.
- Chart
- a pitch map or three bars, one colour for the busiest side, grey for the rest.
Finish with the three sentences. What it shows, what it doesn’t show, and what a coach should look at next.
Part 2: who’s giving the width? Now take your busiest side and split it by player. Is it the full-back or the winger getting the ball there? That’s question 1 from the lesson, answered with data.
Part 3: your own match. Pick one team this weekend and watch the first 20 minutes when they have the ball. Every time they get it into the final third, note the time, the side, who held the width and whether they switched it. After five or six, look for the pattern: same side, same player, same route?
Then watch the first 10 minutes after half-time. Remember Slavia: one change at the break and the whole game moved out wide. Did your team’s width change too?
If you want extra resources to enhance your work, you’ll find them in The Tools: Match Report Lite and Match Report Master, with templates for PowerPoint and Keynote ready to fill in.
04
My week
A busy one. Here’s everything that went out since the last Debrief.
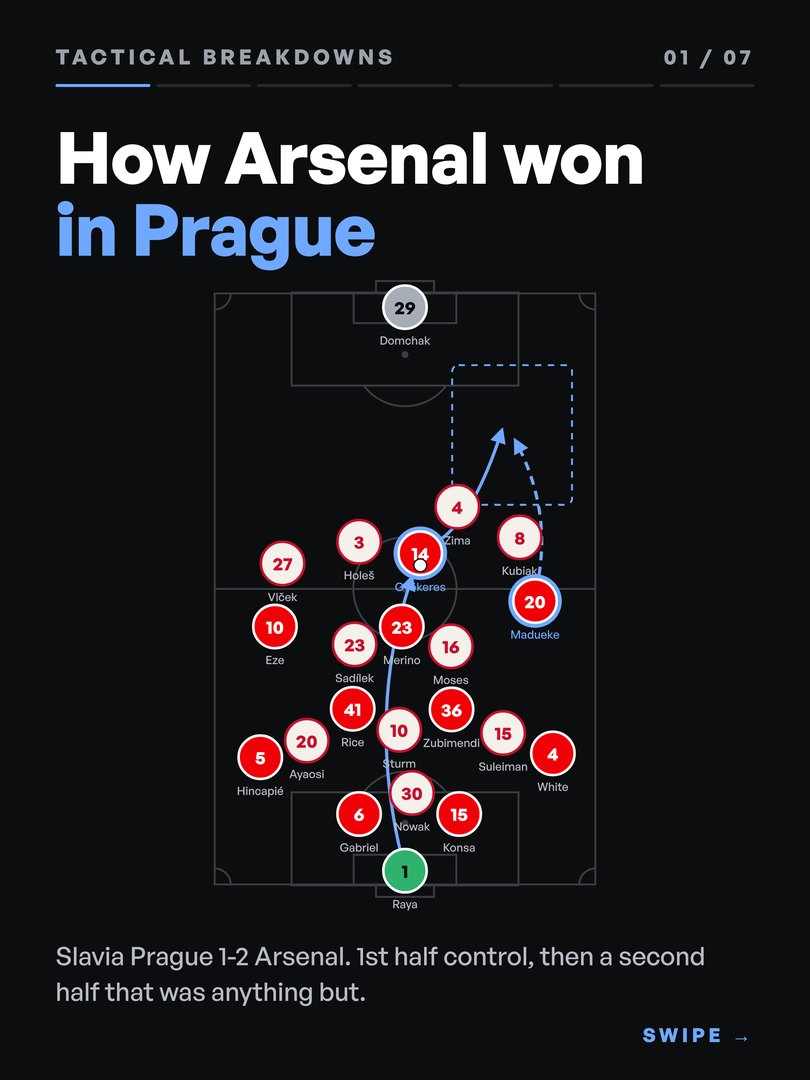
The breakdowns. How Arsenal won in Prague (Fri 6 Nov), a Champions League night that showed both sides of width: two up by the 38th minute, a press with cover, Gyökeres making the long ball a plan, and a second half that nearly got away.
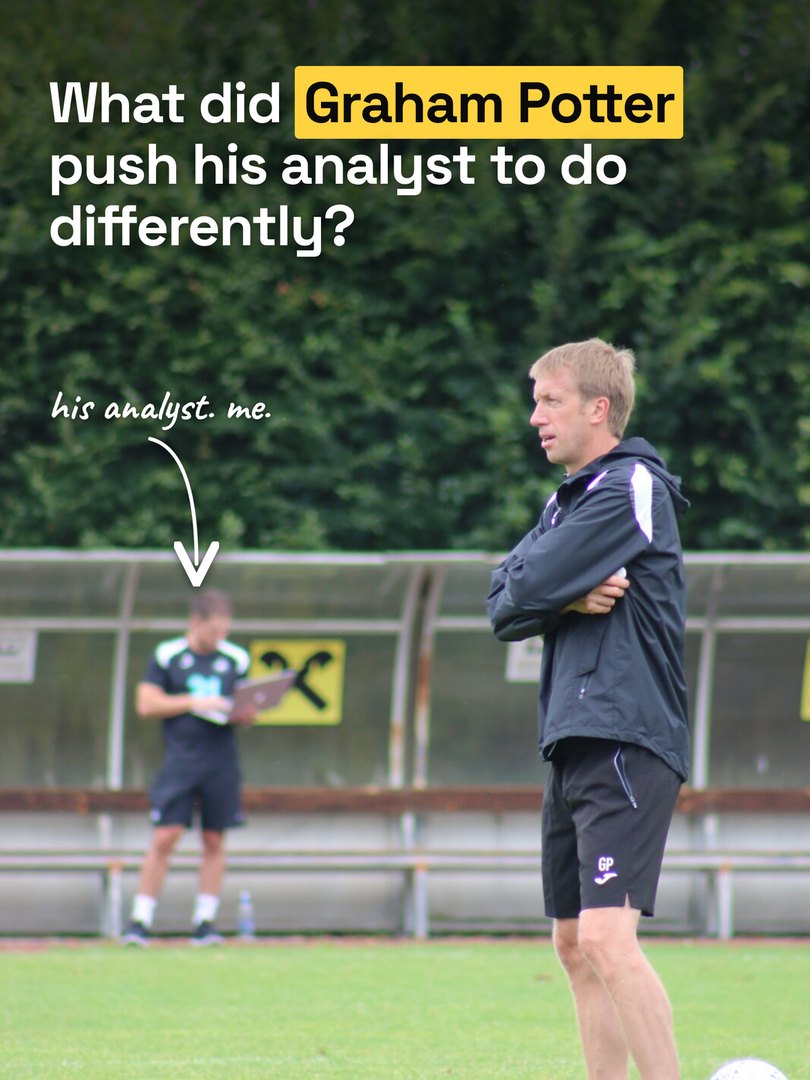
A bit about me. The question Graham Potter pushed me to answer (Fri 6 Nov). A different kind of post: photos from my Swansea years, and the question Graham asked me that changed how I work. It’s on LinkedIn too.
Video. I’ve started a new series of short videos on getting into analysis. The first one on the grid is The free software to start with (Sat 7 Nov), and more are on the way.
If there’s something you want me to cover, hit reply and tell me. I read every one.
Debrief 05 is on the way, landing in your inbox next Thursday...

Cheers,
Harry
The Debrief · Debrief 04
Debrief 04
Why teams use width
Width isn’t about the touchline. It’s about what it does to the middle.
By Harry Lowe · 12 November 2026 · 13 min read
Read the article →Introduction
Hey, legends 🤙🏼
Last week was all about the team without the ball. This week we flip it. When a team has the ball, one of the first things I look at is how wide they are, and who’s making them wide.
“Get it wide” gets shouted from every touchline in the country. But width on its own does nothing. The point of it is what it does to the other team: it stretches them, pulls players out of the middle and opens the gaps you actually want to play through.
So this week we start in Prague, where width gave Arsenal their first goal and nearly cost them the game, then go through the six things I look for, then you get to measure it yourself.
01 · Tactical breakdown
Width in Prague: beating a press and attacking the box
Slavia 1-2 Arsenal is a good case study because width did two different jobs in the same game. Arsenal used it to play past a high press. Slavia used it to get the ball into the box. Below are the concepts behind each one, with the moment from the game that shows it.
Part one · Width in possession
Using width to play past a press
- 1 · Pinning the full-back
- A winger who holds the touchline fixes the full-back in front of him. If the full-back steps inside to help, the winger is free. If he stays wide, the gap between him and his centre-back grows. Either way, the defence has a decision to make. The technical part is the body shape: open to the pitch, scanning before the ball arrives, so the winger sees the gap as it opens. Madueke held the line before the first goal.
- 2 · The blind-side run
- Running from wide into the channel between full-back and centre-back attacks the defender’s blind side. He has to track the ball and the runner arriving from opposite directions, and he can’t watch both. Timing is everything: go as the passer’s head goes down and curve the run to stay onside. That’s the run Madueke made on nine minutes.
- 3 · Width plus a target
- Against a high line, width on its own isn’t enough. You need a target who can win the first ball and play it on first time, so the wide runner is already moving when it arrives. That’s third-man play: the long ball goes to one player, the next touch finds another. Back to goal, body between ball and defender, one touch. Raya to Gyökeres to Madueke.
Watch for it: when a team presses high, watch the winger before the ball goes long. If he’s holding the touchline with the full-back pinned, the run inside is coming.
Part two · Width in the final third
Using width to attack the box
- 1 · Bodies against bodies
- A cross is only as good as the runners it finds. One striker against two centre-backs is a 1v2. Add a second striker and every cross becomes a 2v2, and the defence only has to lose one. Near post, far post, and the runs attack the ball rather than wait for it. Slavia brought Chytil on beside Nowak at half-time to do exactly that.
- 2 · Time on the ball for the crosser
- Defending crosses starts out wide, not in the box. Press the wide player and he has to hurry the cross or play backwards. Drop off and he gets time to look up and pick a run. IMO that’s why Arsenal’s second half got harder: they sat deeper, Slavia’s full-backs had time, and the shots went 17 to 12.
- 3 · The cross from deep
- A ball from deep, whipped between the keeper and his back line, is the hardest cross to defend. It needs one call from the keeper, come or stay, and any hesitation leaves a gap nobody owns. Technically it’s pace and curl away from the keeper into that corridor. Nowak’s goal on 90 minutes came from one.
Watch for it: when a team goes two up front, watch the other side’s defensive line. If it drops towards its own box and stops pressing the wide players, expect the crosses to start coming in.
From the game to the lesson
Six concepts, two jobs. Pinning, blind-side runs and a target get you past a press. Bodies in the box, time on the ball and the cross from deep get you into it. None of it is about the touchline. It’s about what being wide does to the other team’s shape.
That’s what the lesson below breaks down: six things I look for when a team uses width. You’ll see Prague in two of them, Madueke’s run in 04 and Slavia’s crosses in 05.
02 · Lesson
Why teams use width
Width is one of those things everyone mentions and few people actually watch. It’s not about how many players are near the touchline. It’s about what being wide does to the other team’s shape, and where that leaves space. Here are six things to look for, in the order they usually happen. In every board, blue is the team with the ball.
- Who holds the width?
- Stretch the back line
- The switch
- The run inside from wide
- Bodies in the box
- The space it leaves behind
1. Who holds the width?
Start with the simple question: on each side, who’s standing wide? Usually it’s one player per side, and it’s either the winger or the full-back. Rarely both.
That one choice tells you a lot about the plan. If the wingers hold the width, the full-backs are free to tuck inside and help the build-up, like City’s left-back playing as a ten. If the full-backs hold it, the wingers can come inside and play as extra tens or second strikers.
Watch for it changing. A lot of teams swap it during the game: the full-back overlaps, the winger goes inside, and the defender marking him has to decide who to follow.
For an analyst, write it as one line: “On the left, the full-back holds the width and the winger plays inside.”
2. Stretch the back line
Width isn’t really about the touchline. It’s about the gaps it opens in the middle.
When a team keeps a player high and wide on both sides, the other team’s full-backs have to go with them. That pulls the back four apart, and the space between full-back and centre-back gets bigger. That’s the channel attackers want to run into.
If nobody holds the width, the opposite happens. The back four stays narrow and compact, and every pass through the middle has a body in front of it.
When you watch, look at the distance between the full-back and the nearest centre-back. If it’s growing, the width is doing its job.
3. The switch
Most teams don’t attack down both sides at once. They load one side with players, draw the defence across, then switch it quickly to the far side, where the winger is now one against one.
The switch only works if two things are true. Someone has to be holding the width on the far side, and the ball has to get there fast, in one or two passes. A slow switch just gives the defence time to shuffle back across.
Count how many passes it takes a team to change sides. One long diagonal is a weapon. Five short ones is a recycle.
4. The run inside from wide
Once the defence is stretched, the most dangerous thing a wide player can do is go inside.
Some wingers start wide and run inside the full-back, into the channel behind him. That’s Madueke’s run in Prague: he doesn’t come to feet, he starts wide and attacks the space Slavia left behind their press. Others pick it up wide and cut inside on their stronger foot.
Either way, the defence has to shift across to stop it, and that’s when the far side opens up.
When a winger goes inside, don’t watch him. Watch the far side. That’s where the space is opening.
5. Bodies in the box
Width only pays off if someone is there when the ball comes in. A cross into an empty box is a goal kick.
Watch how many players get into the box when the ball goes wide. One runner is a hope. Three is a plan: one near post, one far post, and one arriving late on the edge for the cut-back.
That’s what changed for Slavia after half-time. With Chytil on beside Nowak, every cross had two targets against Arsenal’s centre-backs, and the chances started coming.
For an analyst, the number of runners at the moment of the cross tells you more than the number of crosses.
6. The space it leaves behind
Every bit of width has a cost. When a full-back pushes on to give width, there’s a space behind him, and the other team knows exactly where it is.
Good teams cover it before the ball is lost. The nearest centre-back slides across, or a midfielder drops into the gap, or the winger on that side tucks back. If none of those happen, the counter goes straight into that space.
That’s why you’ll often see one full-back go and the other stay. The one who stays, plus the two centre-backs, make a back three for when the ball is lost.
When a full-back goes forward, look at who’s behind him. If the answer is nobody, that’s where the next attack is going.
From the lesson to the resource
All six of those you can spot by eye. But if you want to know for sure which side a team attacks down, or whether their width changed after half-time like Slavia’s did, you need to count it. That’s this week’s free resource.
03 · Free resource and task
Your first data chart
In Prague you could see the game move out wide after half-time. With data you can prove it. Your first data chart is the free Portal task that shows you how. It gives you a full practice match, Kestrel Bay FC 2-0 Redfern Athletic, laid out like professional event data, and walks you through turning hundreds of rows into one chart a coach can read in a few seconds.
What’s inside- The practice dataset: 3,943 events, every pass, carry, shot and pressure, with where each one started and ended.
- One question, one chart: who, where or when, and the chart that suits each one.
- A worked example: who gets Kestrel Bay into the final third, from definition to filters to chart.
- Three sentences: what it shows, what it doesn’t show, and what a coach should look at next.
- A step-by-step guide: Google Sheets, Excel or Numbers.
Which side do they attack down?
Part 1: measure the width. Open the practice dataset and answer one question: which side do Kestrel Bay attack down? Define it first. Ours: every completed pass or carry by Kestrel Bay that ends in the final third (end_x 80 or more). Then split the pitch into three channels by where each one ends, using end_y: left (0 to 26.6), centre (26.7 to 53.3) and right (53.4 to 80). Count each channel and make one chart.
Here’s a start:
- Question
- which side do Kestrel Bay get the ball into the final third on?
- Filters
- team = Kestrel Bay FC, type = Pass (outcome = Complete) or Carry, end_x 80 or more.
- Count
- split by channel using end_y.
- Chart
- a pitch map or three bars, one colour for the busiest side, grey for the rest.
Finish with the three sentences. What it shows, what it doesn’t show, and what a coach should look at next.
Part 2: who’s giving the width? Now take your busiest side and split it by player. Is it the full-back or the winger getting the ball there? That’s question 1 from the lesson, answered with data.
Part 3: your own match. Pick one team this weekend and watch the first 20 minutes when they have the ball. Every time they get it into the final third, note the time, the side, who held the width and whether they switched it. After five or six, look for the pattern: same side, same player, same route?
Then watch the first 10 minutes after half-time. Remember Slavia: one change at the break and the whole game moved out wide. Did your team’s width change too?
If you want extra resources to enhance your work, you’ll find them in The Tools: Match Report Lite and Match Report Master, with templates for PowerPoint and Keynote ready to fill in.
04
My week
A busy one. Here’s everything that went out since the last Debrief.
The breakdowns. How Arsenal won in Prague (Fri 6 Nov), a Champions League night that showed both sides of width: two up by the 38th minute, a press with cover, Gyökeres making the long ball a plan, and a second half that nearly got away.
A bit about me. The question Graham Potter pushed me to answer (Fri 6 Nov). A different kind of post: photos from my Swansea years, and the question Graham asked me that changed how I work. It’s on LinkedIn too.
Video. I’ve started a new series of short videos on getting into analysis. The first one on the grid is The free software to start with (Sat 7 Nov), and more are on the way.
If there’s something you want me to cover, hit reply and tell me. I read every one.
Debrief 05 is on the way, landing in your inbox next Thursday...
Cheers,
Harry